
Introduction
For many years I had a webcam on my website and have used different methods of making it work. It mainly consisted of a PC or Linux Computer and a USB Camera. This was overkill for a webcam, being noisy, using more power than necessary and taking up a lot of space.
When the Raspberry Pi Camera was launched I could see an immediate use to create a webcam that would overcome all of the downfalls of my current set-up. I had already been using the Raspberry Pi so adding a camera was not too much effort.

My first Webcam used the original Raspberry Pi Model B. I used Raspian and created a script to take pictures every 5 minutes. The script also uploaded them to my website. This was scheduled using cron.
Design
My latest Webcam is a Raspberry Pi 3 Model B computer with a camera and is stuck to a window with the camera pointing outside. Every 5 minutes it takes a photo with the camera and uploads it to my website. You can see the webcam in action here.
I use is Raspberry Pi OS and the webcam software is picam which can be downloaded and installed from the OS. Instructions are provided in the GitHub repository.
picam can be set up and used in a few different ways. I configured mine to take a picture and upload it to my website. Additionally I enabled the video output so I could record the live footage as a security camera. Using software such as Synology Surveillance Station you can detect motion and record video.
I also added a RGB LED as a status indicator as when running the webcam is not connected to a monitor.
Parts
You will need the following parts for this project:
- Raspberry Pi 3 Model B
- Raspberry Pi Camera Module
- MicroSD Card (16GB)
- LM2596 DC-DC Step Down Buck Convertor (eBay)
- 5MM RGB LED
- 3D Printed Case
- 20mm Round Button Suction Cup x 4
- 2.5mm Power Socket
- 12v 2A PSU with 2.5mm power plug
You also need wire and connectors for internal connections. I suggest dupont wires which can be cut and soldered on to the LED’s and Buck Convertor and the other end plugged onto the Raspberry Pi Header.
Everything is available on eBay and considering the current price of later models of Raspberry Pi opt for a used RPi 3 Model B. This has built in wireless so you don’t need to connect to a wired LAN.
Set-up
Most of the setup can be done before mounting the Raspberry Pi in a case. You can power the Raspberry Pi using the USB connector and plug the Monitor into the HDMI or Composite connector. You also need a USB keyboard.
Set up involves downloading Raspberry PI OS from the Raspberry Pi Website and copying it to the microSD card.
Once copied you need to connect the Raspberry Pi to a monitor, keyboard and power supply. Apply power and let the OS boot to the command prompt.
From the command prompt you can use the instructions provided on the picam GitHub repository to prepare the OS, download the picam binary and install it.
Construction
Print the case using a 3D printer. The case is in two parts. The base is printed using Black PTEG filament. This is less likely to warp when exposed to heat than PLA+. The top cover is printed in any colour PLA+.
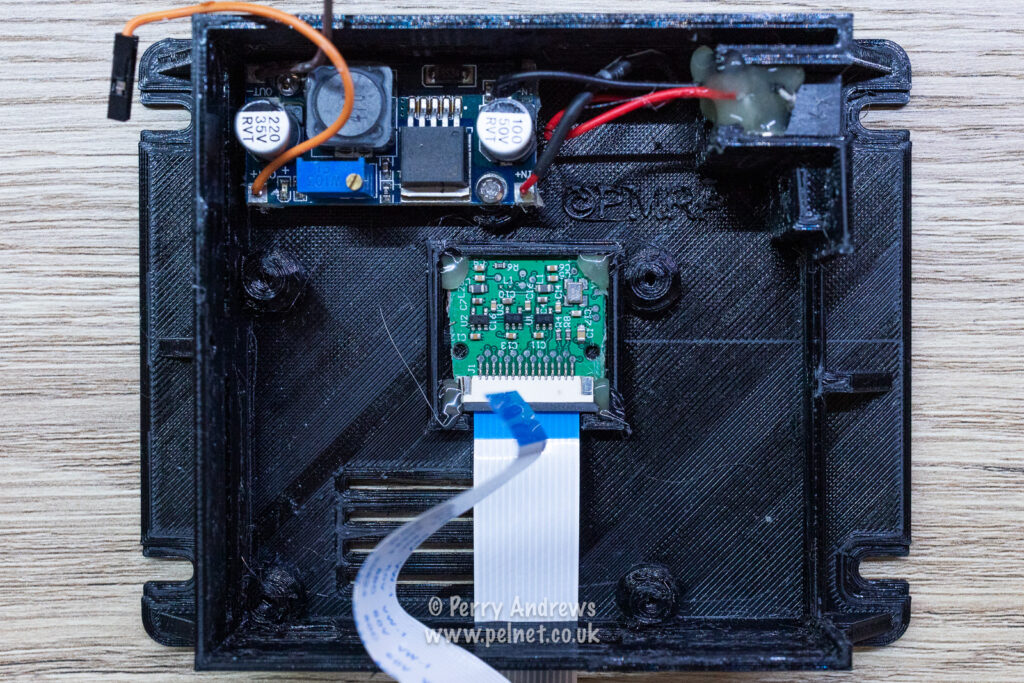
Glue in the camera board with the camera through the square hole. Feed the camera ribbon cable through the thin slot so the cable comes outside the case. Screw in the buck converter and glue in the power socket in it’s small slot.
Before using the step-down buck converter you need to connect it to the power supply and set the output voltage to 5v. Failure to do this before connecting the Raspberry Pi could be disastrous.

Fit the Raspberry Pi in the case by angling the ports in the holes first and then pushing the PCB flat. Secure with 4 self tapping screws. Don’t over tighten. Insert the memory card in the slot after the board has been fitted otherwise the PCB is difficult to push flat.
Connect the Power wires, the Camera ribbon cable and finally the RGB LED wires.

Use the picture above to connect the wires. The camera ribbon camera can be folded gently to fit under the lid when it is fitted. Be careful not to trap it.

The lid is fastened with 4 x 3mm screws. Slide the 20mm suction cups into the slots and you are ready to go.
Leave a Reply